HTTPS/SSL
Secure your Coronium Core server by utilizing the free SSL certificate service Let's Encrypt.
Warning
Setting up a secure Coronium Core server is not a trivial process, so be sure to read through all of the steps before starting, and then follow them carefully.
Screencast Available
Learn how to set up HTTPS in a screencast format by Clicking here.
Overview
To be issued a secure certificate, you must have a fully qualified domain name, and the proper DNS set up to serve the domain.
A fully qualified domain name is basically a registered domain name. Where you decide to purchase a domain is up to you. GoDaddy is a popular choice.
Once you have your domain name, you will need to "point" it to your Coronium Core server. Most domain registars provide a means of setting up DNS.
You will want to set up a 3rd level domain for your Coronium Core server. This looks something like:
coronium.<mydomain>.com
Amazon
When you first install Coronium Core, make sure to add the proper ports to security group settings. You can then use the Route 53 service for your DNS. There are ample guides to assist you.
Once set up, proceed to the Let's Encrypt section below.
DigitalOcean
You will need to point your domain to the DigitalOcean nameservers. The process for this varies by domain registar, but in all cases, you will need the DigitalOcean nameserver addresses, which are:
- ns1.digitalocean.com
- ns2.digitalocean.com
- ns3.digitalocean.com
Instructions for setting nameservers on GoDaddy can be found here.
Droplet Required
Spin up a Coronium Core droplet as outlined in the DigitalOcean Installation section before continuing.
1. In the DigitalOcean control panel, click the Networking link at the top:

2. Enter your new domain name, without any prefix:
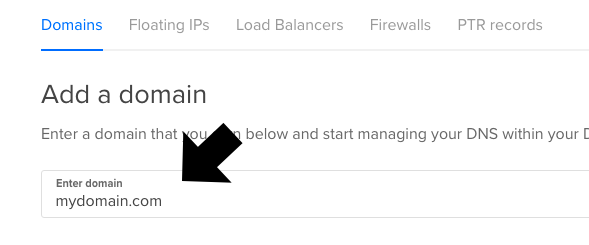
3. Click the Add Domain button:

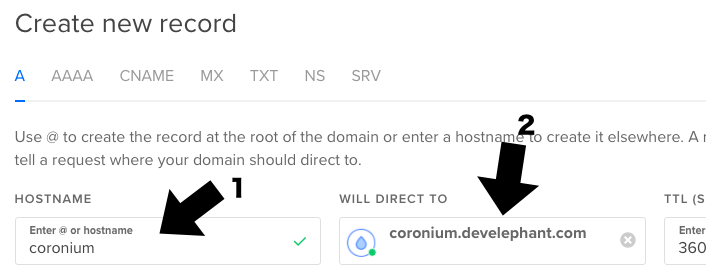
4. On the next screen, do the following:
- Enter the hostname (only the domain prefix) of your Coronium Core server. (1)
- From the WILL DIRECT TO field, select your Coronium Core droplet. (2)
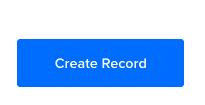
5. Click the Create Record button on the right:
At this point your DNS is set up, but generally needs to propagate. This can take anywhere from 5 minutes to a number of hours (though usually within 15 minutes).
You can check the progress using a site like whatsmydns. Enter the full domain, including the prefix, to test.
Let's Encrypt
Active Domain Required
Do not continue with this guide until you have an active domain name for your Coronium Core server that you can reach through your web browser.
To move your Coronium Core server over to HTTPS, perform the following steps:
1. Log into your Coronium Core droplet using the root user:
ssh root@<your-coronium-domain>
Note: The root user is ubuntu if hosting on Amazon.
If you have not changed the password yet, the default is cloudadmin. You may be prompted for your password at various times during this process.
2. Copy and paste the following on the command line to run the Coronium Core SSL updater:
Configuration Changes
At this point make sure you're ready to move over to HTTPS. The following process will permanently modify your configuration settings.
wget https://s3.amazonaws.com/coronium-core/ssl.sh && sudo bash ./ssl.sh
The script will install the needed components, and update the configuration files.
You will then be propted for the hostname, a fully qualified domain name, and a valid email. These items are required to request a certificate from Let's Encrypt.
As stated earlier, you should have created a 3rd level domain, for example: coronium.<domain>.com. Using the example, when entering the requested information, it might look like:
Input Issues
Make sure to hit the delete key a few times before entering values. If the update returns a confirmation instantly, then a space in the data is the most likely reason. If this happens, start again at step 2 above.
Enter a hostname: coronium
Enter a FQDN: coronium.<domain>.com
Enter an email: you@your-email.com
Be sure to replace the information with your own answers.
Check Your Information
Make sure to triple check your information. If not, then you might not be issued a certificate.
After receiving your secure certificate, the script will exit and your Coronium Core server will be accesible using https.
Server Reboot
It's generally a good idea to reboot the server instance by entering sudo reboot -h on the command line. Wait a minute, and then check to make sure the server is running again.
Be sure to update the host in the client configuration (in the Corona project):
core:init({
  server = "https://<coronium-core-host>"
  ...
})